The Oppo A17 and A17K smartphone, which runs on the Android 12 operating system, now offers a USB OTG feature that allows users to connect USB devices such as flash drives, mice, and DSLR cameras to their device.
This feature is pre-installed and does not require users to root their phones. While not necessary for all users, the USB OTG feature can come in handy when there is a need to transfer files, such as documents, photos, or videos, to a USB drive.
For those of you who want to enable this feature on your Oppo A17, you can read the step-by-step guide in this post. In addition, we will also provide a brief explanation of what USB OTG is.
What is OTG connection on OPPO?
Table of Contents
USB On-The-Go (OTG) is a useful feature available on smartphones like the Oppo A17, allowing the smartphone to connect and interact with various USB devices.
This feature allows you to connect devices such as flash drives, mice, gamepads, DSLR cameras, printers, and more to your smartphone.
Practical uses of USB OTG include expanding storage by connecting a pendrive, using the phone as a remote shutter for a DSLR camera, connecting a mouse for a desktop-like experience, and gaming using a joystick or gamepad connected to the phone’s USB port.
In addition, USB OTG can be used to transfer files from the smartphone to a USB storage device and utilize a PC keyboard to type on the smartphone. Users can refer to the guide provided to learn how to utilize the OTG feature on the Oppo A17 or Oppo A17K.
How to Activate USB OTG on Oppo A17 / A17K
As we have informed above, if Oppo A17 and A17K is equipped with OTG feature. For those who want to transfer files from phone to pendrive or vice versa, the first thing that needs to be prepared is a USB OTG Type C cable or OTG Adapter which is widely sold in online stores.
1. Prepare OTG Type C Cable or Adapter
First of all, prepare your device, be it an Oppo smartphone, a type C OTG cable or a USB device such as a pendrive or something else. If you don’t have a type C OTG cable, you can buy it at an electronics store.
2. Connect OTG Cable to Phone
Next connect the pendrive to the adapter or OTG cable and then plug it into the USB hole on the Oppo A17.
3. Enable OTG Connection
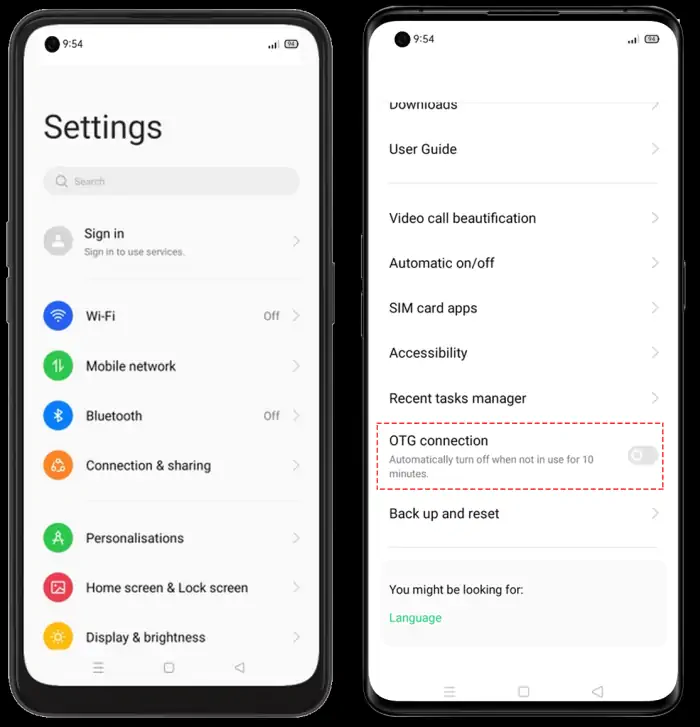
Once connected, open the Oppo A17 phone then launch the Settings app then tap System Settings. Next select the OTG Connection option and enable it.
4. Transfer Files From Smartphone to Pendrive or Vice Versa
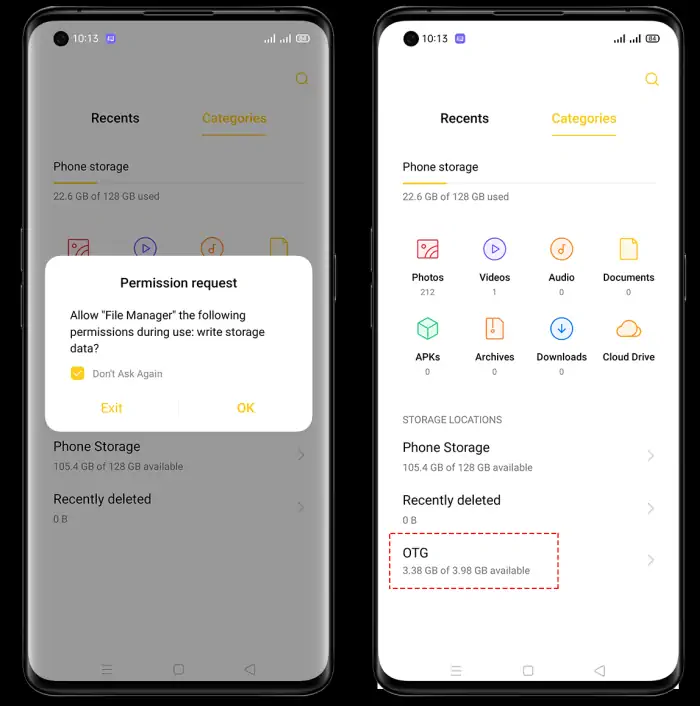
After you enable the OTG Connection feature, the File Manager will open automatically and allow the permission request that appears on the phone screen. Then tap OTG at the bottom of the File Manager and you will see all the folders from the pendrive, then tap the file you want to transfer.
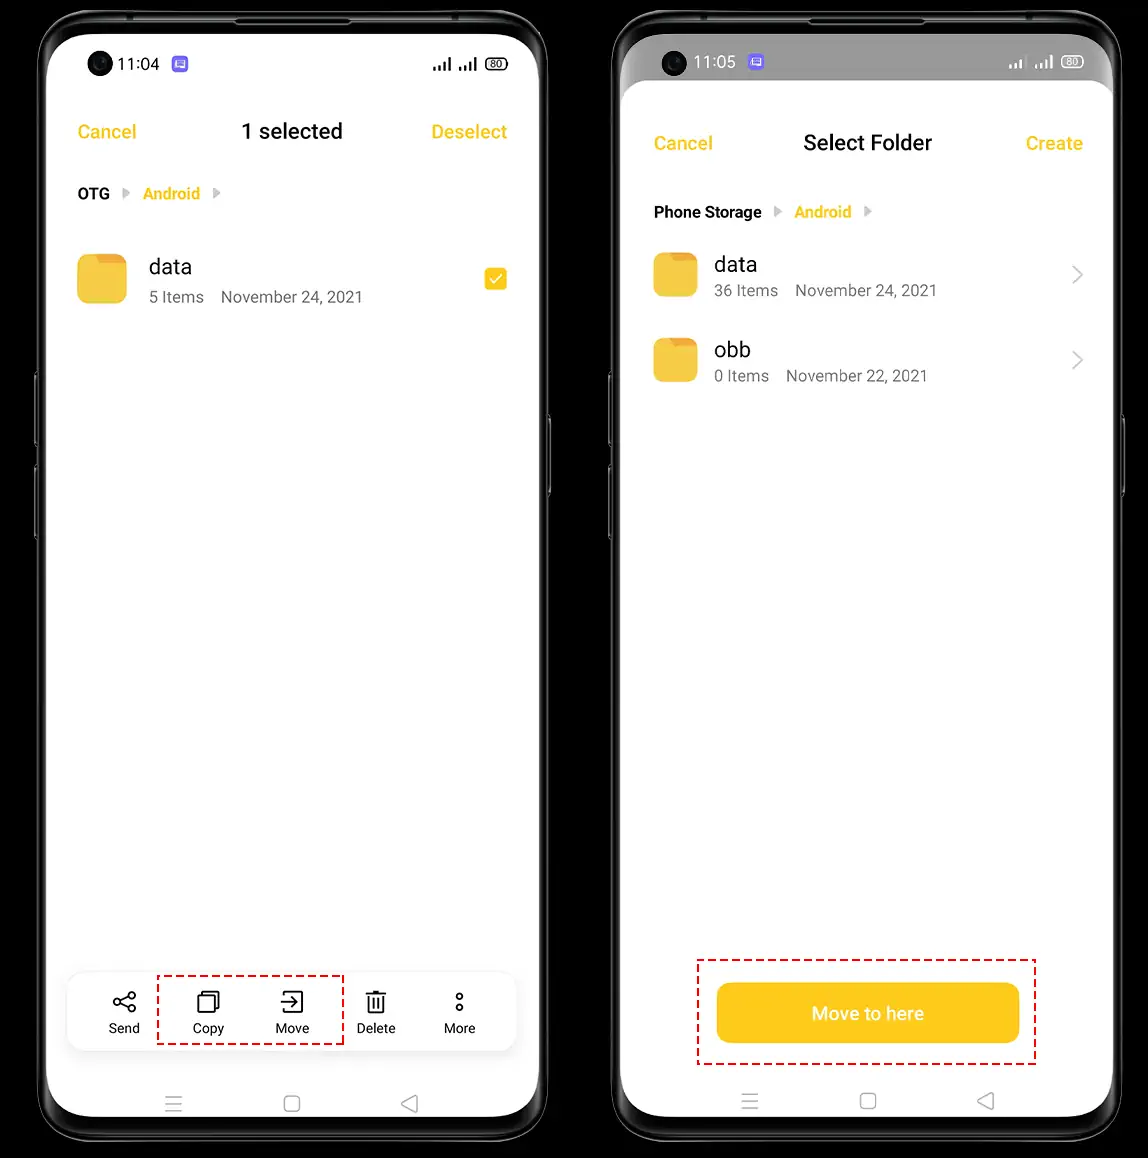
Then tap and hold the file and select Copy or Move. Then select the folder where you want to move the files.
Now you have successfully connected the pendrive to the Oppo A17 using the OTG cable.
After the transfer is complete, you can remove the USB OTG by following the following guide.
How to Safely Remove OTG
To safely remove OTG, you should not immediately unplug it so that the pendrive and Oppo A17 are not quickly damaged. We must first disable the feature in the settings menu or unmount it via the notification panel.
You can disable OTG via Settings > Additional Settings > OTG Connection. Once it’s done, you can safely unmount OTG.
That’s how to activate and use OTG on Oppo A17 or Oppo A17K. After this feature is active, you can copy and paste files to a pendrive, HDD or connect a gamepad to your phone. Hopefully this guide is useful and good luck.


